Wednesday, August 31, 2016

carving apples

How To Carve Apples And Prevent Them From Browning

I love to carve apples. Apple is a perfect material, pattern carved on its skin has a wonderful contrast. This fruit is always availiable at market, so I often add a carved apple to my arrangements. 

The most popular questions I have ever asked is about preventing apples from browning. Indeed, apples easily get dark and can spoil overall impression of your display. In this post I will show and explain what I do to keep carved apple fresh.  

Apple carving for fruit displays

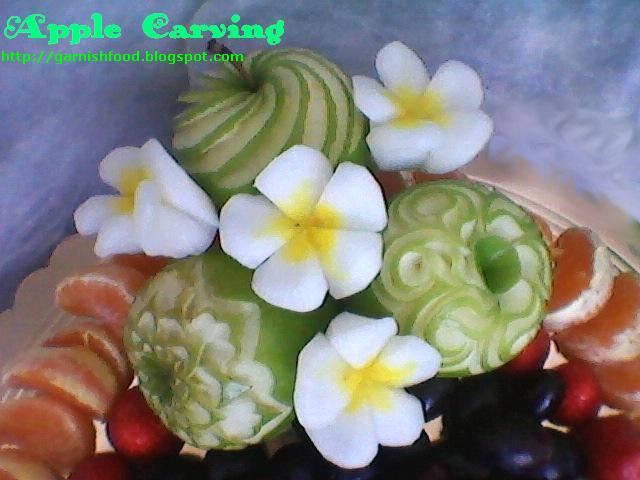
These apples were created as fruit plate's decoration. The apples were carved 12 hours before the photos were taken. They were kept in a fridge overnight, and I am sure they will stay in good condition more 5  or 6 hours that they are supposed to be displayed (I have checked that :-))

apple garnish
Apple carving

apple garnish
Apple carving for fruit display

how to carve apple
Green apples and fragipani flowers

Did you notice that I also love adding frangipani flowers to my displays? This flower was showed me by Khun Narata at her carving class in Chiang Mai, Thailand. I found the flower useful for carving bouquets. It looks sunny and bright.  This type of flower carving keeps good shape during displaying, without getting weak (this is a very important point). 

A florist friend told me off for using yellow color repeatedly  in my displays. Well, I like yellow color, it looks appealing to eat :-)  Do you think so?


how to do apple carving
Apple carving details


apple garnish
Apple garnish for fruit plate


How to carve apples and prevent them from turning brown

There are a few tips on carving apples:

1. Do not carve apples deep inside unless you want them getting dark quickly. Beautiful patterns can be done on the contrast between red/green skin and white flesh, whithout deep cuts.

2. To safe the carved parts white treat them with lemon juice.
I do the following trick. Dissolve lemon acid crystals in water. Dip the apple in the water each time after carving a number of elements and lines. This makes a carved pattern lasting for hours.

3. Wrap a carved apple in food wrap to avoid oxygen make its business.

4. Keep carved apples in a cold place or in a fridge.

how to carve apple tutorial
Dissolve lemon acid in water

how to prevent apple from getting dark
Carve a number of elements

how to carve apple
Dip the apple in acid water to treat the white parts

how to safe apple carving
Carve other section of the pattern and dip the apple in acid water again.

prevent apple from browing
Continie carving and dipping.
Your pattern may take a time, so applying acid water to new details
will secure your nice apple centerpiece 

how to safe apple garnish
Cover the carved apple witn a food plastic wrap to keep the apple away from air

treat apple carving

BEAUTIFULL TYPES OF CARVING

Fruit Carving Art : Fruits are beautiful in their own right, but when their carved or simply arranged in a different way, they look exquisite. Carving fruit is a wonderful talent. Very often we come across these fruit art displays during marriage and festivals. Every year, competitions are held to encourage budding artists to display their imaginations in the form of fruit art. One doesn’t feel like eating these beautiful fruits as they are so magnificently arranged and carved. Hope you like our collection of fruit art ideas. Please share them with your friends.
fruit carving

Fruit Carving artfruit artFruit Carving watermelonfruit art watermelonFruit Carving swanfruit artFruit Carving facefruit art facesFruit Carving watermelonfruit art watermelon heartFruit Carving tajmahalfruit art tajmahalFruit Carving orangefruit art orangeFruit Carving intricatemelonfruit art intricate melonFruit Artfruit artFruit Artfruit artfruit artFruit Artfruit artfruit artFruit Artfruit artFruit Artfruit artFruit Art applefruit art applefruit art designfruit art designvegetable art woman vegetable artFruit Artfruit art food photography

Saturday, August 27, 2016

carving apple as elephant trunk

Elephant Head Apple

How to choose apples for carving.
Apples should have a smooth, unbroken skin. They should have a consistant colour and a good shape.
1. Cut a very small segment about 1/2 cm wide and 2 cm long out of  the apple and leave it in place.Carving An Elephant Head Apple Picture 1
2. Cut into the apple either side of the first segment to cut out a slightly larger segment below the original segment.Carving An Elephant Head Apple Picture 2
3. Continue like this making bigger and bigger segments that go deeper into the apple. Stop when the bottom of a segment reaches the middle of the apple.Carving An Elephant Head Apple Picture 3
4. Pull out the segments and arrange them so they overlap each other.Carving An Elephant Head Apple Picture 4
5. The finished carving. The widest part of the apple looks like the bumps on an elephant�s head and the apple trails down into the elephant�s trunk.Carving An Elephant Head Apple Picture 5

carving apple into a leaf

An Apple Leaf

How to choose apples for carving.

choose the fresh apple and medium size red apple
1. Cut a segment from the apple.Carving An Apple Leaf Picture 1
2. Trim the segment into the shape of a leaf.Carving An Apple Leaf Picture 2
3. Cut a teardrop shape on one side of the apple.Carving An Apple Leaf Picture 3
4. Continue cutting teardrop shapes out of the apple as in the picture.Carving An Apple Leaf Picture 4
5. Cut triangular shapes around the edge of the apple.Carving An Apple Leaf Picture 5
6. The finished carving.Carving An Apple Leaf Picture 6

carving carrot as jumbpa flower

Jumbpa Carrot Flower

1. Peel off the outer skin of a carrot.Carving Jumbpa Carrot Flowers Picture 1
2. About 5 cm from the end of the carrot cut out some of the carrot so a flat edge is left on the carrot.Carving Jumbpa Carrot Flowers Picture 2
3. Make five flat edges around the carrot. The carrot will end up with a pointed end.Carving Jumbpa Carrot Flowers Picture 3
4. Cut under one of the edges down to the point but do not cut all the way down to the end.Carving Jumbpa Carrot Flowers Picture 4
5. Make similar cuts under each of the five flat edges. When you make the last cut it should be possible to pull the finished flower off the end of the carrot.Carving Jumbpa Carrot Flowers Picture 5
6. The finished carving.Carving Jumbpa Carrot Flowers Picture 6