Thursday, September 1, 2016

carvin water melon as swan

  1. step-1

  2. Purchase a watermelon. Choose the shape according to what you'd prefer to see placed on the table.
    • Before carving, wash the watermelon to reduce the chance of salmonella contamination. Be sure to use clean knives and a clean cutting surface.
    • Ensure the whole watermelon is at room temperature when you carve. Making the cuts will be easier when the watermelon is not cold.
    • Chill the watermelon in the refrigerator after cutting and before serving, if necessary.
  3. Image titled Carve a Watermelon Swan Step 2
    2
    Cut a thin slice from the bottom of the whole watermelon. This will stabilize the melon and prevent it from toppling over. When you've finished carving, place the swan basket onto a serving plate to protect surfaces the swan is placed on.
    • Also choose a flat working surface on a solid base before you work on the watermelon.
  4. Image titled Carve a Watermelon Swan Step 3
    3
    Draw the outlines for the swan. Draw the design on the watermelon rind using a fine to medium point waterproof marker or a sharp pencil.
  5. Image titled Carve a Watermelon Swan Step 4
    4
    Use a sharp knife or a food decorating tool to cut along the lines of the pattern as shown here. Cut all the way through the rind when cutting the top portion of the swan design. The melon above this line will be cut away once the design is done.
    • For better grip and to help protect your hands, use a fresh, new thick pair of gardening gloves with gripper palms.
  6. Image titled Carve a Watermelon Swan Step 5
    5
    Use care to leave the beak attached to the feathers when carving it in. This is essential for the stability of the design.
  7. Image titled Carve a Watermelo  Swan Step 6
    6
    Use a knife to hollow out an eye. This is best done before removing the top flesh because it's a delicate cut and the weight of all the melon still in place will help you to get it right.
  8. Image titled Carve a Watermelon Swan Step 7
    7
    Remove the top section of the watermelon. Cut it into quarters, then gently pulling the pieces apart one by one. Keep an eye out for any attached parts that need a bit more cutting to release the melon rind and flesh. Cut smoothly instead of tugging to avoid the design to tear.
  9. Image titled Carve a Watermelon Swan Step 8
    8
    Hollow out the melon. Trim the features so they're are not too thick or uneven.
    • Use a melon baller to remove the remaining melon. These balls will be added back into the swan basket on completion of the hollowing.
  10. Image titled Carve a Watermelon Swan Step 9
    9
    Fill the watermelon swan with 1 cup of melon balls and grapes, or any other fruitbeing used. The exact amount will depend on the size of the melon – you may be able to fit more or less than one cup. Serve any remaining fruit, including melon balls, in another bowl or make another carved watermelon to balance as a pair.
  11. Image titled Carve a Watermelon Swan Intro
    10
    Finished.

Video

Tips

  • When attaching cut pieces on the watermelon to make your design, use round toothpicks or skewers. Flat toothpicks will often break due to the weight of the piece or the thickness of the rind.
  • For more detailed designs, draw a template first on a sheet of white paper with a marker or pencil. When finished, transfer the image to the watermelon surface by taping the paper to the melon and tracing along the design’s lines with a pencil, making the design right on the watermelon surface. Also, for more control, you might consider drilling a hole and using a coping saw to cut the rind.
  • Consider using a channel knife for certain cuts and to hollow out larger areas.
  • Use a sharp knife with a pointed tip – the sharper the knife, the easier and cleaner the cuts will be. Be careful!
  • This is best recommended when it is watermelon season – the rind will be a little bit thinner, which can make all the difference!

Warnings

  • The sharper the knife, the safer you are because less force will be needed to cut through the water


Wednesday, August 31, 2016

carving apples

How To Carve Apples And Prevent Them From Browning

I love to carve apples. Apple is a perfect material, pattern carved on its skin has a wonderful contrast. This fruit is always availiable at market, so I often add a carved apple to my arrangements. 

The most popular questions I have ever asked is about preventing apples from browning. Indeed, apples easily get dark and can spoil overall impression of your display. In this post I will show and explain what I do to keep carved apple fresh.  

Apple carving for fruit displays

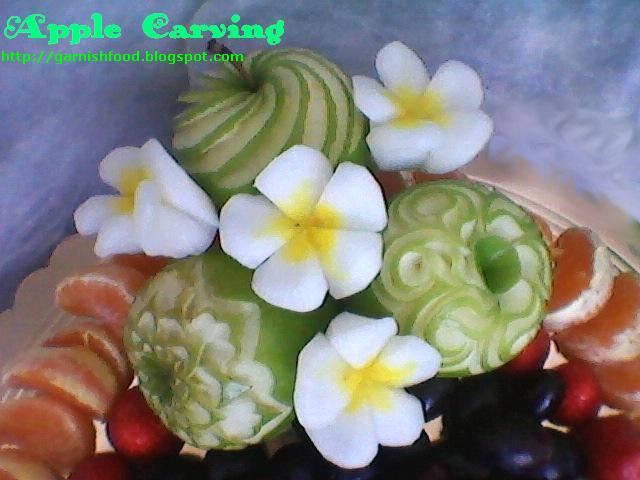
These apples were created as fruit plate's decoration. The apples were carved 12 hours before the photos were taken. They were kept in a fridge overnight, and I am sure they will stay in good condition more 5  or 6 hours that they are supposed to be displayed (I have checked that :-))

apple garnish
Apple carving

apple garnish
Apple carving for fruit display

how to carve apple
Green apples and fragipani flowers

Did you notice that I also love adding frangipani flowers to my displays? This flower was showed me by Khun Narata at her carving class in Chiang Mai, Thailand. I found the flower useful for carving bouquets. It looks sunny and bright.  This type of flower carving keeps good shape during displaying, without getting weak (this is a very important point). 

A florist friend told me off for using yellow color repeatedly  in my displays. Well, I like yellow color, it looks appealing to eat :-)  Do you think so?


how to do apple carving
Apple carving details


apple garnish
Apple garnish for fruit plate


How to carve apples and prevent them from turning brown

There are a few tips on carving apples:

1. Do not carve apples deep inside unless you want them getting dark quickly. Beautiful patterns can be done on the contrast between red/green skin and white flesh, whithout deep cuts.

2. To safe the carved parts white treat them with lemon juice.
I do the following trick. Dissolve lemon acid crystals in water. Dip the apple in the water each time after carving a number of elements and lines. This makes a carved pattern lasting for hours.

3. Wrap a carved apple in food wrap to avoid oxygen make its business.

4. Keep carved apples in a cold place or in a fridge.

how to carve apple tutorial
Dissolve lemon acid in water

how to prevent apple from getting dark
Carve a number of elements

how to carve apple
Dip the apple in acid water to treat the white parts

how to safe apple carving
Carve other section of the pattern and dip the apple in acid water again.

prevent apple from browing
Continie carving and dipping.
Your pattern may take a time, so applying acid water to new details
will secure your nice apple centerpiece 

how to safe apple garnish
Cover the carved apple witn a food plastic wrap to keep the apple away from air

treat apple carving

BEAUTIFULL TYPES OF CARVING

Fruit Carving Art : Fruits are beautiful in their own right, but when their carved or simply arranged in a different way, they look exquisite. Carving fruit is a wonderful talent. Very often we come across these fruit art displays during marriage and festivals. Every year, competitions are held to encourage budding artists to display their imaginations in the form of fruit art. One doesn’t feel like eating these beautiful fruits as they are so magnificently arranged and carved. Hope you like our collection of fruit art ideas. Please share them with your friends.
fruit carving

Fruit Carving artfruit artFruit Carving watermelonfruit art watermelonFruit Carving swanfruit artFruit Carving facefruit art facesFruit Carving watermelonfruit art watermelon heartFruit Carving tajmahalfruit art tajmahalFruit Carving orangefruit art orangeFruit Carving intricatemelonfruit art intricate melonFruit Artfruit artFruit Artfruit artfruit artFruit Artfruit artfruit artFruit Artfruit artFruit Artfruit artFruit Art applefruit art applefruit art designfruit art designvegetable art woman vegetable artFruit Artfruit art food photography

Saturday, August 27, 2016

carving apple as elephant trunk

Elephant Head Apple

How to choose apples for carving.
Apples should have a smooth, unbroken skin. They should have a consistant colour and a good shape.
1. Cut a very small segment about 1/2 cm wide and 2 cm long out of  the apple and leave it in place.Carving An Elephant Head Apple Picture 1
2. Cut into the apple either side of the first segment to cut out a slightly larger segment below the original segment.Carving An Elephant Head Apple Picture 2
3. Continue like this making bigger and bigger segments that go deeper into the apple. Stop when the bottom of a segment reaches the middle of the apple.Carving An Elephant Head Apple Picture 3
4. Pull out the segments and arrange them so they overlap each other.Carving An Elephant Head Apple Picture 4
5. The finished carving. The widest part of the apple looks like the bumps on an elephant�s head and the apple trails down into the elephant�s trunk.Carving An Elephant Head Apple Picture 5